Written by Lydwine Camus – QA Engineer at Genymobile
This tutorial will tell you how to use Genymotion to simulate device location changes. More specifically, it will explain how to plan a route – for say a car trip, show you how to generate a script and how to automatize every single GPS movements.
But first, let’s take a look at what is automation and what it can bring to app development.
What is the main goal of automation ?
Automation is a great way to save time and improve product quality.
Take, for example, automated unit tests and functional tests: much faster than manual tests, they allow developers and quality engineers to make sure there are no regressions. Automation can also improve your product quality by running the same scripts in different environments, testing on many platforms and devices.
That’s where Genymotion comes into play
Genymotion offers two features to automate testing: GMTool and Genymotion Shell. By combining these 2 tools many automation possibilities await.
What is GMTool and what can I do with it ?
GMTool is a command line tool that allows you to use every command of Genymotion and virtual devices in order to automate a series of actions. It can be started by running gmtool from a command prompt, from the installation path of Genymotion.
Here are examples of the main commands:
Look up the device templates list: gmtool admin templates
Choose a template, then create and start a device:
• Creating a device: gmtool admin create
• Starting a device: gmtool admin start
Your device is ready to be used!
When you are done using it, you can stop and delete it using these commands:
• Stopping a device: gmtool admin stop
• Deleting a device: gmtool admin delete
What is Genymotion Shell and what can I do with it ?
As the name indicates, Genymotion Shell is a shell which allows you to script the modification of sensor statuses and values.
You can interact with different kind of sensors, such as battery, GPS, Network, phone, baseband… For example, you can use Genymotion shell to activate the GPS and set your own values for the latitude, longitude, altitude… Just like this:
Activate the GPS: gps setstatus enabled
• Set latitude: gps setlatitude 25.2289
• Set longitude: gps setlongitude 145.4578
With these simple commands we can imagine multiple tests like calculating the distance between two points, simulating a location, simulating a trip step by step (by foot, by car, by train…).
What is Genymotion Shell and what can I do with it ?
Let’s see step by step how we can create and emulate a trip by car::
1. Choose a programming language
For this example we choose to use Python.
2. Plan your route
We can easily do that using Google Maps. So head over to Google Maps, select the car option and start planning a route. Once your route is defined, copy the page URL link in the address bar to your clipboard.
3. You need to convert your route to a .gpx file
GPX is an XML based format for GPS tracks. To convert your route we’d propose you to visit gpsvisualizer.com/convert_input. You can ignore most of the available options. Just select Gpx and paste the Google Maps URL into the field labelled “provide the URL of a file on the Web” and press Convert button.
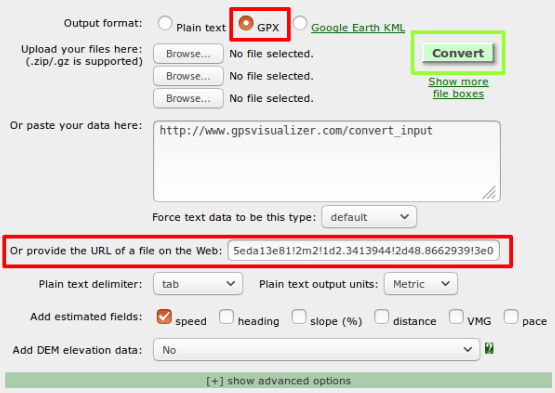
A new page is displayed which shows you the .gpx content and gives you the option to download it.
4. You need something to be able to manipulate your .gpx file
Using Python we can use the gpxpy library, which allows us to parse and manipulate GPX files. The main goal of this manipulation of gpx file is to get all GPS coordinates of your route (latitude and longitude) to finally set them in a device using Genymotion shell.
We can obtain something like this:
Some explanations
• Line 8 and 9: open and parse the gpx file to create a gpx object.
• Lines 10 to 15: create a subprocess calling Genymotion shell.
• Lines 16 to 33: activate the gps and use the gpx object to get latitude and longitude points. Then set these values to Genymotion Shell
• Line 28: Do a sleep during X second (more on this below)
• Line 34 to 38: we properly close our subprocess
Why are we using a X second sleep line 28?
Without sleep the script would run almost instantly so as to emulate a certain speed (here about 100 km/h), therefore we need to use the sleep() function to wait between each point.
This value (sleep = X) depends on
• The distance between 2 points
• The speed you want
Considering Speed = Distance / Duration
We have Duration of a sleep() = distance between 2 points / Speed
To see the result:
1. Start genymotion
2. Start a device
3. Install openGapps corresponding to your android device version
4. Install and launch Google maps
5. Run this script
You should see your current position moving on the map following your defined route.